Despite living in Oregon for two decades now I can’t deny that Mt. Rainier is THE MOST BEAUTIFUL mountain in the entire Pacific Northwest (sorry Mt. Hood.) The sheer size of Mt. Rainier is something that you have to experience up close to truly experience.
From the right viewpoint on Mt. Rainier, you can see dozens of glaciers, wildlife, and waterfalls that are just jaw-droppingly beautiful.
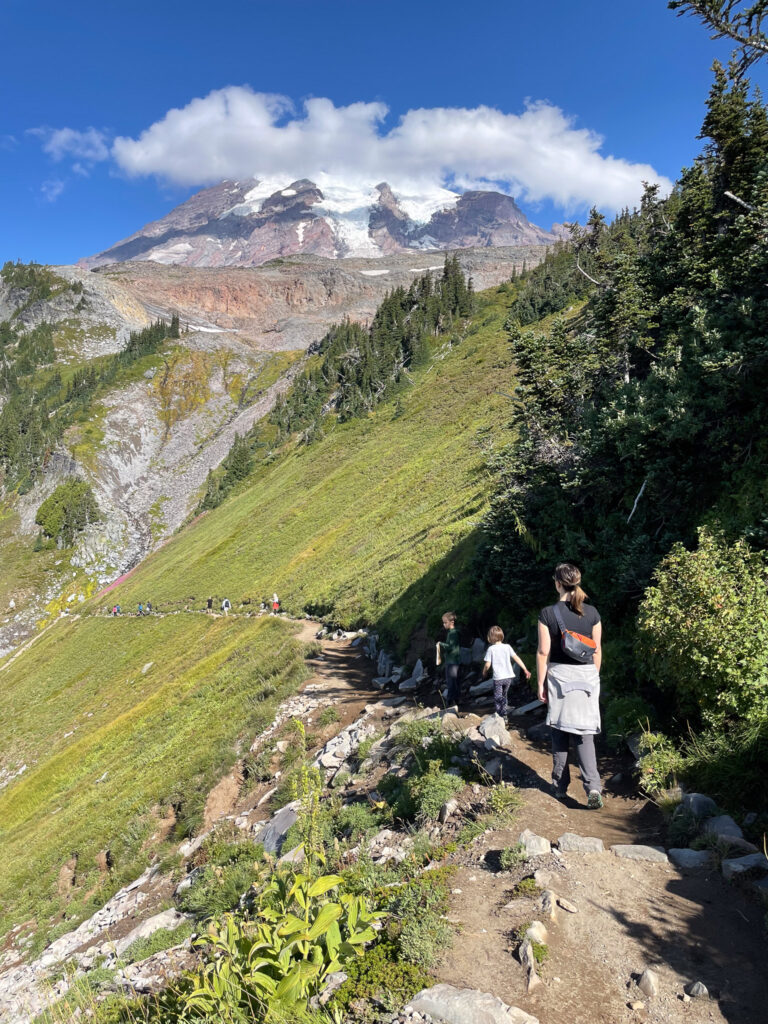
The best place to find these views, in our opinion, is from the Skyline Loop Trail. This trail takes you uphill from the Paradise Visitors Center and places you front and center to one of the most majestic views in the Pacific Northwest, if not the entire world!

About the Skyline Loop Trail
- Length: 5.7 miles
- Elevation Gain: 1,750 feet
- Difficulty: Moderate/Difficult – The first 2 miles are consistently uphill but the views make it worth it!
- Permits/Parking Pass: National Park Entry Fee and Mt. Rainier Timed Entry Pass
- Trail Map:
New for 2024: Mt. Rainier now requires Timed Entry Passes to enter the park from either the Paradise or Sunrise entry points. Passes are required during the summer months only and between the hours of 7am – 3pm. Check the park website for details before visiting.
How to Get to the Skyline Trail
The Skyline Loop Trail starts at the Paradise parking lot on the south side of Mt. Rainier. This extremely busy part of Mt. Rainier has a visitor center, lodge, restrooms, and dining options that you can visit before or after the hike.

We made a beeline to the soft serve ice cream in the lodge after finishing up our hike of the Skyline Trail!
Paradise is located approximately 35 minutes from the Nisqually entrance station on the southwest side of the park.
From Seattle plan on the drive taking 2 to 2 1/2 hours to Paradise and add an extra 30 minutes to that time if driving up from Portland.
For us the drive from Bend to our campsite at the Cougar Rock Campground was approximately 6 hours.
When to Visit Skyline Trail
The Skyline Trail is best visited in mid to late summer when the wildflowers are blooming. We last hiked the trail in over Labor Day weekend and there were still plenty of wildflowers to take in although last year was a late snow year.

Summer hiking also brings out the crowds but we think it is worth joining our fellow hiking friends to fully enjoy the views all along this incredible trail.
We’d recommend starting early (prior to 8am) both to take advantage of the morning light on the mountain and to beat the crowds. Although hopefully with the timed entry system going into place for 2024 that should alleviate some of the prior year’s parking concerns.
We’d recommend keeping an eye on the trip reports on AllTrails to keep tabs on when the trail is snow-free and when the wildflowers are popping!
With all that said!
This is a trail that CAN be enjoyed year-round. We have visited in the spring and snowshoed up the ridge to take in the amazing winter views of the mountain.
Winter trips are also a treat but keep an eye on the weather as conditions can change FAST up on the mountain.
What to Expect Along the Trail
The Skyline Loop Trail is best done in a clockwise direction. This allows you to take in the best views along the early parts of the trail while heading uphill. If done counterclockwise these views will be at your back and you’ll probably miss some incredible shots!

From the Visitor Center, the trail heads consistently uphill for a little over two miles. If you’re hiking on a nice summer day then expect a conga line-like crowd of hikers making their way up the trail.
We began our hike EARLY, like 6:30 am early, and it was still extremely busy, although it would have been even more so later in the morning as evidenced by the combat parking situation we came back to. But that’s a holiday weekend for you!
Luckily, there are plenty of spots to step aside and take in the views along the way.
Glacier Vista viewpoint is at about the halfway point of the climb and makes a great spot to sit down for a snack and to take in the views. Some side trails will take you closer to the edge of the gully below where you will have some incredible views of the Nisqually Glacier.
We sat here for at least 20 minutes and counted at least a dozen waterfalls cascading from the glaciers above.
From there it is another mile of uphill hiking to reach Panorama Point. The views to the south from Panorama Point were breathtaking and we were lucky to be able to see Mt. St. Helens, Mt. Adams, and Mt. Hood along with all of the smaller peaks surrounding Mt. Rainier.

Once you’ve reached this point there is a little bit of uphill left but for the most part, the worst of the climbing is over.
Tip: If you’ve been “holding it” on the hike up and need a little privacy then there are some very scenic and rustic restrooms to use near Panorama Point. You can probably expect a line but it’s better than any of the other options along the way up!
From here you can either choose to head back down the way you came up or continue on with the rest of the loop (~3.5 miles remaining.)
Cutback Options on the Skyline Loop
At mile three of the trail, you’ll pass the intersection with the Golden Gate Trail. This trail cuts about a mile off of the Skyline Loop and makes for a good out if your legs are starting to get a little tired.
We hiked the trail with our 6 and 4-year-olds. and they were starting to reach the whiny stage that even trail snacks couldn’t fix so we opted to take this cutback option.

While we were bummed to miss some of the waterfalls along the last mile of the Skyline Loop Trail there were a number of lovely views and creek crossing on the Golden Gate Trail!
Some of the highlights for us were coming across a field of fireweed in full bloom and getting an up-close look at a marmot wandering across the trail directly in front of us.
At the end of the trail, we highly recommend stopping by the lodge for a cold treat. There is a small coffee shop in the corner of the lodge that serves up drinks, snacks, and soft-serve ice cream.
Things to Know About the Skyline Trail and Mt. Rainier
Stay on the Trail
Because the trail runs through the high alpine meadows of Mt. Rainier make sure to stay on the trails during your hike. There are some points higher up where you are on rock and can scramble around but the lower reaches of the trail are extremely susceptible to erosion and can take years, or even decades, to heal from user-created trails.
Watch for Wildlife
Mt. Rainier is home to a plethora of wildlife so keep your eyes peeled. On this hike alone we saw marmots, pikas, deer, and even a black bear!
Listen for the telltale calls of the marmot during the hike. Their high-pitched chirps echo through the canyons and serve as a reminder to keep your eyes open to see one of these lazy-looking creatures.
Bring Sunscreen
Hiking at altitude means your risk of getting a sunburn is significantly higher. Even more so if you’re hiking on snow!
Layer up on the sunscreen early to avoid any uncomfortable days ahead.
Be Courteous of Other Hikers
This hike is one of the most popular hikes on Mt. Rainier, if not the entire state of Washington. It’s pretty much a guarantee that you’ll be around A LOT of other folks for the entirety of the hike.
This can get frustrating when people block the trails or you can’t enjoy the solitude you may have expected to get on a difficult hike like the Skyline Trail.
Just remember that you are part of the crowd and everyone is there to enjoy themselves and take in the incredible scenery that is Mt. Rainier.
If you need to take a break take a step off the trail to let folks pass and don’t stop to take photos directly in the middle of the trail.
Know Your Limits
The Skyline Trail is no joke! While the uphill is tough we actually saw more people struggling on the downhill.
Once your legs are tired it can be easy to get complacent and make a mistake while going downhill. Rocks and sandy trail conditions make it easy to slip and fall.
Prepare for High Altitude Hiking Conditions
While you probably won’t be alone on the Skyline Loop Trail there is no reason to come unprepared.
Pack, at minimum, a set of layers in case the weather changes as it can change fast at high altitudes, a first aid kit, plenty of water, and some trail snacks.
I can’t count the number of people we saw hiking the loop with only a single 12oz plastic water bottle!
We started with two water bladders and two water bottles full for the 4 of us and it was all gone before we even finished the trail. And the day we hiked wasn’t even all that hot!